Hello everyone!
Thanks to everyone who has read and followed my blog. I wanted to let you know that this will be the last post here on the "Dining with the Mouse" blogger site... but it is not the end of the blog.
My sister and I have decided to merge our personal Disney blogs and put one blog on our Kingdom Planners company site. I will still be recreating Disney food, but the move will allow me to also post about a variety of other Disney subjects... because I love it all!
Out company site is www.KingdomPlanners.com and you can go directly to the blog by clicking www.KingdomPlanners.com/blog . There is even a tab on the menu bar for "Dining with the Mouse" if you want to go directly to the food related posts. See... so easy! Thanks again and I hope you join us over at the new blog.
Susan
Saturday, March 24, 2012
Saturday, February 18, 2012
Sunshine Seasons - Key Lime Tart
I love, love, love the Key Lime Tart at the Sunshine Seasons food court in The Land Pavilion at Epcot.
Back in the day, The Land's food court was called the Farmer's Market. There were different food stations (similar to Sunshine Seasons), but you had to purchase your food at separate cash registers. I remember this being a real pain and hectic for my family because we would never want lunch from the same station. There were windows for Ice Cream (and Toll House cookies... my dad's favorite), Pasta, Soups/Salads, Barbecue and Potatoes. I would get either the spaghetti plate or a loaded baked potato. Ahhh... memories.
Now, the food court has a fresh, modern feel. The food is freshly made and best of all... you get everyone's food and then pay at the same cash register. The dessert station has many tempting options, but I go for the same thing almost every time... the Key Lime Tart! I love the buttery sweet graham cracker crust and the tart filling.

Here is a picture of the ingredients...

First, I took graham crackers and put them in a Ziploc baggie.... then I beat the heck out of them. You could, of course, use a food processor... but mine was being stubborn and I couldn't get the darn thing to turn on. Plus, this is a good stress reliever.


Then whip up 1 1/2 cups heavy cream until soft peaks form and then transfer to another bowl.


Back in the day, The Land's food court was called the Farmer's Market. There were different food stations (similar to Sunshine Seasons), but you had to purchase your food at separate cash registers. I remember this being a real pain and hectic for my family because we would never want lunch from the same station. There were windows for Ice Cream (and Toll House cookies... my dad's favorite), Pasta, Soups/Salads, Barbecue and Potatoes. I would get either the spaghetti plate or a loaded baked potato. Ahhh... memories.
Now, the food court has a fresh, modern feel. The food is freshly made and best of all... you get everyone's food and then pay at the same cash register. The dessert station has many tempting options, but I go for the same thing almost every time... the Key Lime Tart! I love the buttery sweet graham cracker crust and the tart filling.
Just looking at that photo makes me hungry! The recipes I have for the Key Lime Tart are very convoluted and perhaps incomplete... so I tried my best to follow the recipe.. knowing that it might not come out quite right.
Here is a picture of the ingredients...

First, I took graham crackers and put them in a Ziploc baggie.... then I beat the heck out of them. You could, of course, use a food processor... but mine was being stubborn and I couldn't get the darn thing to turn on. Plus, this is a good stress reliever.

You want to end up with 1 3/4 cup of crumbs. Put this in a bowl with 1 cup of sugar and 1 1/2 cups melted butter.... yes, that's right. 1 1/2 cups!

I couldn't believe how liquid-y this was... and that the liquid was all butter. But, I was following the recipe. I poured this into a pie plate and a bread pan (I don't have tart shells... but those would be better and your end product will be more like the original).

I didn't really feel good about the recipe at this point... the crust seemed too strange... but per the instructions I put it in the refrigerator for a few hours to set up (you could do this overnight).
Now this is where the recipe got a little confusing. The instruction were very vague regarding what was supposed to be key lime filling and what was supposed to be in the meringue. First step was to bloom 1 Tbs powdered gelatin and 1/4 cup water over a double boiler until it is clear. Do not let it boil. Then set it aside.


Then whip up 1 1/2 cups heavy cream until soft peaks form and then transfer to another bowl.


Next, heat 1 cup of sugar and 4 egg whites (be sure not to have any yolk in there) over a double boiler, whipping constantly with a whisk. I assumed that this was going to be my meringue.


Transfer this meringue mixture to a mixer bowl. Beat on high until very stiff.

Now, the recipe says to mix the warm gelatin mixture with the meringue and the lime juice with the heavy cream. I am not sure that is the proper procedure. The picture is me folding the key lime juice into the cream.

I filled my graham cracker crust filled pans with the cream mixture and then topped it with the meringue. I have to say, the meringue was glossy and beautiful.

Now, I have a kitchen torch... but when I went to use it to brown the meringue... I realized that I didn't have any fuel for the torch. Duh. Anyway, I put the pies under the oven broiler for a few minutes and it turned out nicely. I know that the original tart has little blobs of piped meringue... but I love meringue so I just smeared it over the whole pie.

Here is a cross section of the pie after we took a few slices out...


The verdict? It tasted delicious. The crust was to die for (not surprising since it has so much butter and sugar!)... although it was tough to cut through. Individual tart pans would have solved this problem.. The filling was tart and the meringue was sweet... yum.
The problem with the pie was the texture. The filling was way too airy... not as dense as the original Epcot tart. It was just flavored whipped cream. I think the issue is where the recipe said to put the gelatin mixture. When I make this again I will put the gelatin in with the filling... not the meringue. And I think it would be better if the filling chilled in the crusts and was allowed to setup a bit before putting the meringue on and serving it. Also, to be more like the original I might add a drop or two of yellow food coloring to the filling.... it would visually differentiate it from the meringue topping.
I am not a very experienced baker and this was the very first meringue I have ever made. Are there any bakers out there who have any advice? I would love to perfect this recipe because I love key lime tarts/pies so much.
What is your favorite dessert from Sunshine Seasons?
Thursday, January 19, 2012
Liberty Tree Tavern - New England Pot Roast
The Liberty Tree Tavern is a wonderful restaurant in the Liberty Square "land" of the Magic Kingdom. I really like the colonial atmosphere and I have always had a good meal there. The Liberty Tree Tavern serves a la carte lunch options and a "family style" turkey meal at dinner. I prefer the options at lunch and I enjoyed the pot roast lunch entree a few years back.
Here is the menu description of the pot roast:
New England Pot Roast... Our Tavern Keeper's Favorite - Braised beef in a Cabernet wine and mushroom sauce served with mashed potatoes and garden vegetables - $17.99
Sound like a good choice for dinner on a cold Michigan winter night, right? There are a few different recipes for the Liberty Tree Pot Roast floating around on the web and in the Disney cookbooks... and I chose to follow the New England Pot Roast recipe in the Cooking with Mickey and the Disney Chefs because I only had about 2 1/2 pounds of meat (some recipes called for 6 pounds). I did tweak the recipe a bit, but I will explain that as I go.
Here is a picture of all the ingredients needed:

Then I took the meat out of the pot and set it aside. I added 1 stick (1/2 cup) butter to the pan and let it melt. Make sure you keep all of those brown bits in the pot... it gives the sauce great flavor.


Here is the menu description of the pot roast:
New England Pot Roast... Our Tavern Keeper's Favorite - Braised beef in a Cabernet wine and mushroom sauce served with mashed potatoes and garden vegetables - $17.99
Sound like a good choice for dinner on a cold Michigan winter night, right? There are a few different recipes for the Liberty Tree Pot Roast floating around on the web and in the Disney cookbooks... and I chose to follow the New England Pot Roast recipe in the Cooking with Mickey and the Disney Chefs because I only had about 2 1/2 pounds of meat (some recipes called for 6 pounds). I did tweak the recipe a bit, but I will explain that as I go.
Here is a picture of all the ingredients needed:

First of all, I heated 1/4 cup of vegetable oil in my pot. Then I seared the meat on all sides. I used about 2 1/2 pounds of chuck roast. The recipe calls for 3 pounds boneless beef shoulder roast.
Then I took the meat out of the pot and set it aside. I added 1 stick (1/2 cup) butter to the pan and let it melt. Make sure you keep all of those brown bits in the pot... it gives the sauce great flavor.

Next, I added 2 cups large diced carrots, 2 cups large diced celery and 2 cups large diced onions.

Then I added 1/4 cup chopped garlic. Normally I would recommend chopping it fresh, but someone had brought this jarred garlic over to my house the other day, so I used it.

Now, this is one place where I ventured away from the printed recipe. The entree description mentions a mushroom sauce and there are no mushrooms to be found in this recipe (although they are in some of the other versions of this recipe). Since I had mushrooms on hand, I added them. Just one package of sliced white mushrooms. I actually wish I had added more because they were very good in the sauce.

2 Tablespoons chopped fresh thyme went in next.

Saute until the veggies are tender and then stir in one cup of flour.

Cook the flour a bit so that your dish doesn't taste like paste. Add 1 cup wine (the entree description mentions a Cabernet sauce, so I used a Cabernet). Don't worry about the funny purple color the dish has... it comes out fine :)

Stir in 6 cups of beef broth.

At this point you can add the beef back into the pot and cover it.

Do you like my Le Creuset dutch oven? It was very favorite wedding present last year (I shouldn't play favorites but I put it on my registry as a "dream" present and I couldn't believe someone actually got it for me.... I mean... us). I call it "my precious." Unfortunately, "my precious" is really, really heavy... especially when filled with pot roast and gravy. I didn't want to deal with hoisting it in and out of my small oven, so I cooked the pot roast on the stove top (low flame). If you want to put in the oven, the recipe calls for 350 degrees.
The recipe says to cook the roast for 45-60 minutes, which is crazy-talk! There is no way pot roast can get tender in 45 minutes. I cooked mine for almost 3 hours and it could have gone longer.
Here is the finished pot roast...


I sliced the meat and served it on top of mashed potatoes.

The verdict? It was really good and my husband approved. The meat was tender and the gravy was full of flavor. The recipe made an enormous amount of gravy (even if I had doubled the amount of meat), but don't throw it away after eating the pot roast. I saved the gravy and used it to make a shepherd's pie the next night. I browned up some ground turkey (you can use beef if you like), then I mixed in the pot roast gravy and vegetables. I put it in a casserole dish, covered it with some mashed sweet potatoes and some cheddar cheese. I popped it in the over to brown the potatoes a bit and melt the cheese. It was yummy way to use the leftovers.
The pot roast was a success.. the recipe was easy and the results were close to what the Liberty Tree Tavern served. It is just too bad that I wasn't able to go for a ride on the Haunted Mansion after this meal!
Is the Liberty Tree Tavern New England Pot Roast a go-to of yours or do you choose a different menu item when visiting the restaurant? I like several items on the menu so I will be cooking some of the other Liberty Tree Tavern dishes for this blog in the future. What's your favorite?
Friday, January 6, 2012
Crystal Palace - Puffed French Toast
This is one of my all-time favorite foods... the Puffed French Toast from the Crystal Palace restaurant in the Magic Kingdom. I remember going to the restaurant as a child when it was a cafeteria-style establishment. You would take a tray and pick up what ever you wanted along the line and pay at the end. The Puffed French Toast was entree-sized and absolutely delicious. There were no characters to entertain us while dining back then, just the beautiful interior and the small birds that would fly around inside.
These days the Crystal Palace is a character meal which features Winnie the Pooh and "friends." I still enjoy the restaurant and it probably is my favorite character meal (although it does get LOUD in there!). It is a lot of fun and the food is good. They still serve the Puffed French Toast, but it has been miniaturized and you can find it at the "children's buffet" (a shorter buffet table set up for the little ones to serve themselves). I feel no guilt or embarrassment as I take food from the kids' table each time I visit!
A good tip for having breakfast at the Crystal Palace is to make your reservation for the earliest opening of the day, before the park opens to the public. This way, you can get some great family photos in front of the castle with almost no one else on Main Street. Also, you will have had a great breakfast and already be in the park when the "rope drops" at the Magic Kingdom.
Ok... on to the food! I made this as a special treat for New Year's Day. Here is a pic of the ingredients...

Yes, that is an episode of Friends on my tv in the background. I can't resist a good Friends repeat!
First, I cut the bread into thick slices. The recipe calls for Texas Toast, but my grocery store didn't have any (or even any bakery white bread that I could cut into think slices), so I bought a loaf of Italian bread. I knew I was using it for french toast, so I bought it from the day-old bread section since I was going to want it a bit stale anyway. Stale bread soaks in the custard much better and won't fall apart like fresh bread in the egg mixture. I didn't cut the crusts off, but it might be a good idea if your bread has a tough, crispy crust.


Let's just go crazy and add butter and maple syrup.

This certainly doesn't need syrup, but I love the thick, super-sweet magic that happens when that cinnamon coating mixes with the maple syrup. I guess it brings back those childhood Disney memories. My husband prefers it without butter and syrup and says it tastes like a yummy churro.
I think Piglet (with my Mickey doll) would approve!

These days the Crystal Palace is a character meal which features Winnie the Pooh and "friends." I still enjoy the restaurant and it probably is my favorite character meal (although it does get LOUD in there!). It is a lot of fun and the food is good. They still serve the Puffed French Toast, but it has been miniaturized and you can find it at the "children's buffet" (a shorter buffet table set up for the little ones to serve themselves). I feel no guilt or embarrassment as I take food from the kids' table each time I visit!
A good tip for having breakfast at the Crystal Palace is to make your reservation for the earliest opening of the day, before the park opens to the public. This way, you can get some great family photos in front of the castle with almost no one else on Main Street. Also, you will have had a great breakfast and already be in the park when the "rope drops" at the Magic Kingdom.
Ok... on to the food! I made this as a special treat for New Year's Day. Here is a pic of the ingredients...

Yes, that is an episode of Friends on my tv in the background. I can't resist a good Friends repeat!
First, I cut the bread into thick slices. The recipe calls for Texas Toast, but my grocery store didn't have any (or even any bakery white bread that I could cut into think slices), so I bought a loaf of Italian bread. I knew I was using it for french toast, so I bought it from the day-old bread section since I was going to want it a bit stale anyway. Stale bread soaks in the custard much better and won't fall apart like fresh bread in the egg mixture. I didn't cut the crusts off, but it might be a good idea if your bread has a tough, crispy crust.

In a large bowl, I mixed together 2 eggs, 2 1/2 Tbs sugar, 1/2 tsp salt, and 1/2 tsp vanilla extract.

Then I added 2 cups milk. Next, I gradually whisked in 1 cup of flour and 2 1/2 tsp baking powder. Mix until it is smooth.

In a shallow dish, combine 4 tsp cinnamon with 3/4 cup sugar and set aside.


Place a few slices of bread in the custard and let it sit a few minutes to soak up some creamy goodness. Meanwhile, heat up about 1 inch of vegetable oil in a pan (I used my cast iron skillet).

When you think that your oil is hot enough, take your soaked bread pieces (let any excess batter drip off) and carefully place them in the hot oil. I used tongs to make sure didn't splatter any oil and they made it easy to carefully flip them over. Only cook a few pieces at a time... if you crowd the pan the oil will drop in temperature.

After a few minutes the bottoms should be golden brown and you can flip them over to cook on the other side.

When they are golden brown on both sides, place them on a plate covered in paper towels (which will soak up some of the excess oil).

While they are still warm, coat them in the cinnamon sugar topping. Really press them into the sugar and get a nice coating... this is the good stuff! Get the sides too. I did this with my hands, but since they are pretty warm you may want to use forks or spoons to coat them.


And that's pretty much it! If you are feeding a crowd and want to serve all the pieces at once you may want to keep the french toast warm in a low oven while you continue cooking.
Here is the final result!


This certainly doesn't need syrup, but I love the thick, super-sweet magic that happens when that cinnamon coating mixes with the maple syrup. I guess it brings back those childhood Disney memories. My husband prefers it without butter and syrup and says it tastes like a yummy churro.
I think Piglet (with my Mickey doll) would approve!

Thursday, December 29, 2011
Hollywood & Vine - Root Beer Bourbon Sweet Potatoes
I am so glad to be back to blogging after a loooong hiatus. The day after my last blog post I took a home pregnancy test and got a big positive! That was great, but it wasn't long before any mention of food made me ill, and I certainly wasn't able to cook. Honestly, food lost all appeal for the majority of my pregnancy and then I was too tired to cook after having the baby. Now my daughter is almost 6 months old and I feel like life is returning to normal... kind of!
I decided to make these Root Beer Bourbon Sweet Potatoes because I had a ton of sweet potatoes left over from holiday cooking. Actually, I had all the ingredients on hand except for the bourbon. These sweet potatoes hail from the Hollywood & Vine restaurant in Disney's Hollywood Studios theme park. I have only gone to the character breakfast at Hollywood & Vine, so I have not tried the "real deal" version of the sweet potatoes in the park. I wonder how these measure up?
This recipe was fairly easy. Here are the ingredients:
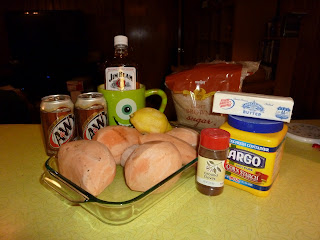
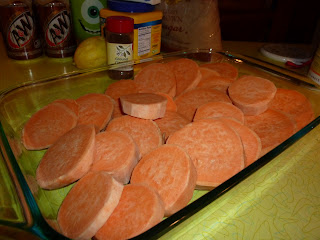
The most time-consuming part of the recipe is peeling the sweet potatoes. I peeled them and cut them into 1/2" rounds (approximately). I then put them into a 9x11 inch baking dish and put them into a 350 degree oven.
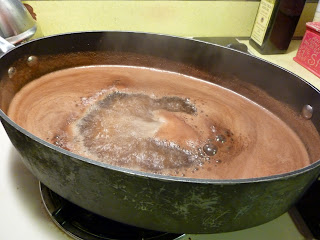
Next, I put all of the sauce ingredients into a pan. 4 cups of root beer, 2 Tbs lemon juice, 1 cup bourbon, a pinch of ground cloves, 3/4 cup brown sugar, and a stick of butter (1/4 pound).


I decided to make these Root Beer Bourbon Sweet Potatoes because I had a ton of sweet potatoes left over from holiday cooking. Actually, I had all the ingredients on hand except for the bourbon. These sweet potatoes hail from the Hollywood & Vine restaurant in Disney's Hollywood Studios theme park. I have only gone to the character breakfast at Hollywood & Vine, so I have not tried the "real deal" version of the sweet potatoes in the park. I wonder how these measure up?
This recipe was fairly easy. Here are the ingredients:

The most time-consuming part of the recipe is peeling the sweet potatoes. I peeled them and cut them into 1/2" rounds (approximately). I then put them into a 9x11 inch baking dish and put them into a 350 degree oven.

Next, I put all of the sauce ingredients into a pan. 4 cups of root beer, 2 Tbs lemon juice, 1 cup bourbon, a pinch of ground cloves, 3/4 cup brown sugar, and a stick of butter (1/4 pound).

I brought this mixture to a boil and then turned the heat down to a simmer. The sauce simmered for about 20 minutes.

In a small bowl I mixed 6 Tbs of cornstarch into 3/4 cup water. Be sure to whisk this so there are no lumps. Whisk this mixture into the root beer sauce and stir until it thickens.

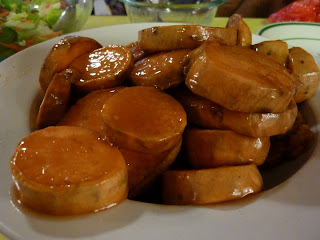
Once the sweet potatoes were tender (took about an hour in my oven), I tossed them in some of the sauce. This recipe made a TON of sauce... way too much for my 3 pounds of sweet potatoes... so just add the amount that looks good to you.

The verdict: These potatoes were ok. I think that I personally didn't like the round cuts of potato. They took a long time to cook and were still kind of tough around the edges. I think cubes of potato would work better, or just mash them and add some of the sauce. The sauce was very mild.... not bad, but I don't know if it added enough flavor to make it worth the effort.
As far as price goes, the ingredients I used probably came to about $10... $5 going towards the bourbon. Not too bad considering it would feed at least 6 people with a ton of sauce to spare (I froze the extra in some ziploc baggies). The dinner buffet at Hollywood & Vine is $35/adult so it makes sense to make these at home if you are only craving sweet potatoes!
I am so glad to be back to cooking and blogging. I think the next blog will be one of my all-time favorite Disney foods... the Crystal Palace Puffed French Toast. I don't know how I will ever lose all my pregnancy weight but the French Toast is definitely worth the splurge!
Subscribe to:
Posts (Atom)